Calling all budding artists and curious minds! Salt painting is an engaging and surprisingly simple art technique that combines creativity with a touch of science.
It’s perfect for kids of all ages, from toddlers exploring textures to older children honing their artistic skills.
The magic lies in the interaction between salt and paint. When sprinkled on wet paint, salt crystals absorb the water, creating beautiful textured effects and unique patterns.
So, grab your paints, some salt, and get ready to embark on a journey of artistic discovery!
Here are 20 salt painting ideas to inspire your little Picassos:
Classic Salt Painting:
Watercolor Wonders:

This is a great starting point. Use white cardstock or watercolor paper and paint on a base layer of watercolors. While the paint is still wet, sprinkle generous amounts of salt. Watch in amazement as the salt creates lighter, textured areas within the color.
Rainbow Explosion:

Paint a rainbow on your paper and sprinkle salt strategically for a vibrant, textured masterpiece.
Sparkling Snow Scenes:

Create a winter wonderland with a blue or white base. Paint snowmen, trees, or houses, and then sprinkle salt for a snowy effect.
Ocean Escapades:

Paint a blue base for the ocean and green for seaweed. Add yellow or orange for a stunning sunset. Sprinkle salt generously to create a beautiful textured ocean effect.
Dazzling Night Sky:

Paint a dark blue or black background and sprinkle salt before adding white spots for stars and a shimmering moon.
Creative Critters and Creatures:
Feathery Friends:

Paint a colorful bird or owl, leaving areas for the feathers unpainted. Sprinkle salt on these areas to create a textured, feathery look.
Underwater Adventures:

Paint a simple fish with bold colors and sprinkle salt for shimmering scales. Add seaweed and bubbles for a complete underwater scene.
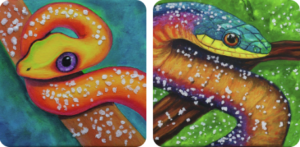
Scaly Surprise:

Paint a vibrant snake or lizard and sprinkle salt on its body for a cool, textured effect.
Hoppy Fun:

Create a playful bunny with fluffy salt-textured fur.
Roaring Dinosaurs:

Paint a mighty dinosaur and sprinkle salt on its back for a rough, prehistoric texture.
Beyond the Brush:
Fingerprint Fun:

Use washable paint and have your child dip their fingers in different colors. Let them make colorful prints on the paper and sprinkle salt for a unique, textured design.
Fork Fantasies:

Dip a fork in paint and create interesting patterns on the paper. Sprinkle salt while the paint is wet and see the magic happen!
Straw Splatter:

Dip a straw in paint and blow onto the paper to create splatters. Sprinkle salt for a textured, abstract masterpiece.
Leaf Impressions:

Collect leaves and dip them in paint. Carefully press them onto paper and sprinkle salt for a beautiful leaf print with a textured twist.
Salt Stencils:

Cut out shapes from construction paper or cardstock. Place them on your paper and sprinkle salt around the stencil. Gently remove the stencil to reveal a cool, negative space design.
Spooky and Spectacular:
Spooky Silhouettes:

Paint a black background and use white paint to create spooky silhouettes of ghosts, bats, or pumpkins. While the paint is wet, sprinkle salt for a ghostly, textured effect.
Ghoulish Glow:

Paint a jack-o-lantern with orange paint and sprinkle salt for a textured, spooky glow. Add black paint for creepy eyes and a grinning mouth.
Haunted Houses:

Create a spooky silhouette of a haunted house and sprinkle salt on the windows and roof for an eerie, textured look.
Festive Fun:
Sparkle Fireworks:

Paint a dark blue background and sprinkle salt with a splatter technique to create a firework display. Add pops of yellow, orange, and red for a festive touch.
Merry Messages:

Use glue to write a message like “Happy Holidays” or draw holiday shapes like snowflakes or candy canes. Sprinkle salt on the glue for a festive, textured greeting card.
Sparkling Snowflakes:

Cut out snowflake shapes from white paper. Paint them with blue paint and sprinkle salt for a stunning textured snowflake decoration.
Salt Painting Tips for Success:
- Use thick watercolor paper or cardstock to avoid warping.
- Experiment with different paint consistencies. Thicker paint creates a more dramatic textured effect.
- Let the children sprinkle the salt generously for maximum impact.
- Use a hairdryer on a cool setting to speed up the drying process.
The Science Behind the Art:
- Salt Crystal Symphony: Once your artwork is dry, use a magnifying glass to examine the salt crystals. Discuss how salt absorbs water and creates unique textures.
- Colorful Crystals: Experiment with adding a few drops of food coloring to the salt before sprinkling it on the paint. Observe how the colors mix and create new hues.
Sensory Exploration:
- Salt in Motion: While the paint is still wet, use a straw to gently blow the salt around the paper. This creates swirling patterns and adds a fun, interactive element.
- Textured Treasure Hunt: After the painting is dry, have your child close their eyes and feel the different textures created by the salt and paint.
Taking it Further:
- Collage Creations: Use salt-painted papers as cutouts for collages. Combine them with other materials like construction paper, fabric scraps, or buttons for a multi-dimensional artwork.
- Salt Shakers of Creativity: Repurpose old salt shakers by filling them with colored salt. Kids can use them to sprinkle salt on their artwork for a controlled application.
- Salt Sculptures: Combine salt painting with a bit of sculpting. Create a base shape from cardboard or air-dry clay and paint it. While the paint is wet, sprinkle salt for added texture.
Cleaning Up:
- Salt painting can get a little messy! Keep a damp cloth handy for easy cleanup.
- Salt can clog drains, so dispose of leftover salt in the trash or use it in another craft project.
Salt painting is a fantastic way to nurture your child’s creativity and introduce them to the fascinating world of science. With a little imagination and these inspiring ideas, you can create lasting memories and stunning works of art together!

